Pages

8.21.2010

Bunga dari perca (From scrap to flowers)

Pernah ga punya kain kain sisa kaya gini? sayang banget kalo dibuang gitu aja


Have you ever have this much scrap? I don't have the heart to just throw them into garbage bin


Dengan banyaknya blog tutorial cara bikin bunga dari kain sisa, saya tertantang untuk bikin juga

With all those 'how to make fabric flowers from scraps blogs', I was challenged to make one

Pertama ambil kain sisa, saya ambil yang paling besar terlebih dahulu

First, grab your scrap. I choose the biggest first. 
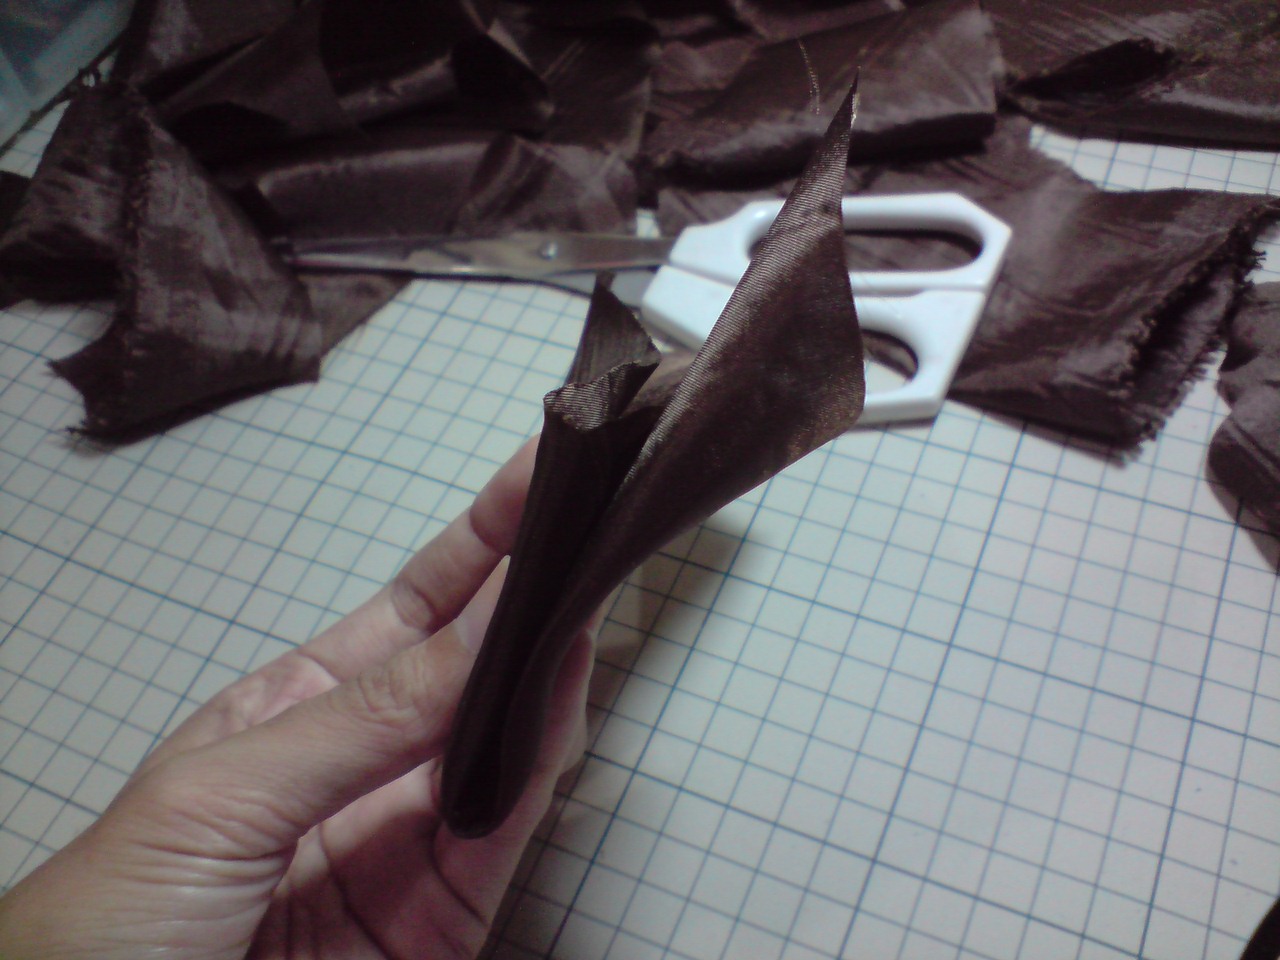
Lalu lipat hingga sudutnya saling bertemu seperti ini

Now fold until all of the edges meet, just as shown on the picture
Potong seperti bentuk hati

Cut into heart shape
Begini bentuknya setelah lipatannya dibuka

Here's how its looked after you unfold it


Sekarang lakukan hal yang sama pada sisa
 kain yang lebih kecil, saya gunting dengan bentuk seperti gambar

Now do the same to the smaller scrap , I shaped it in a different way

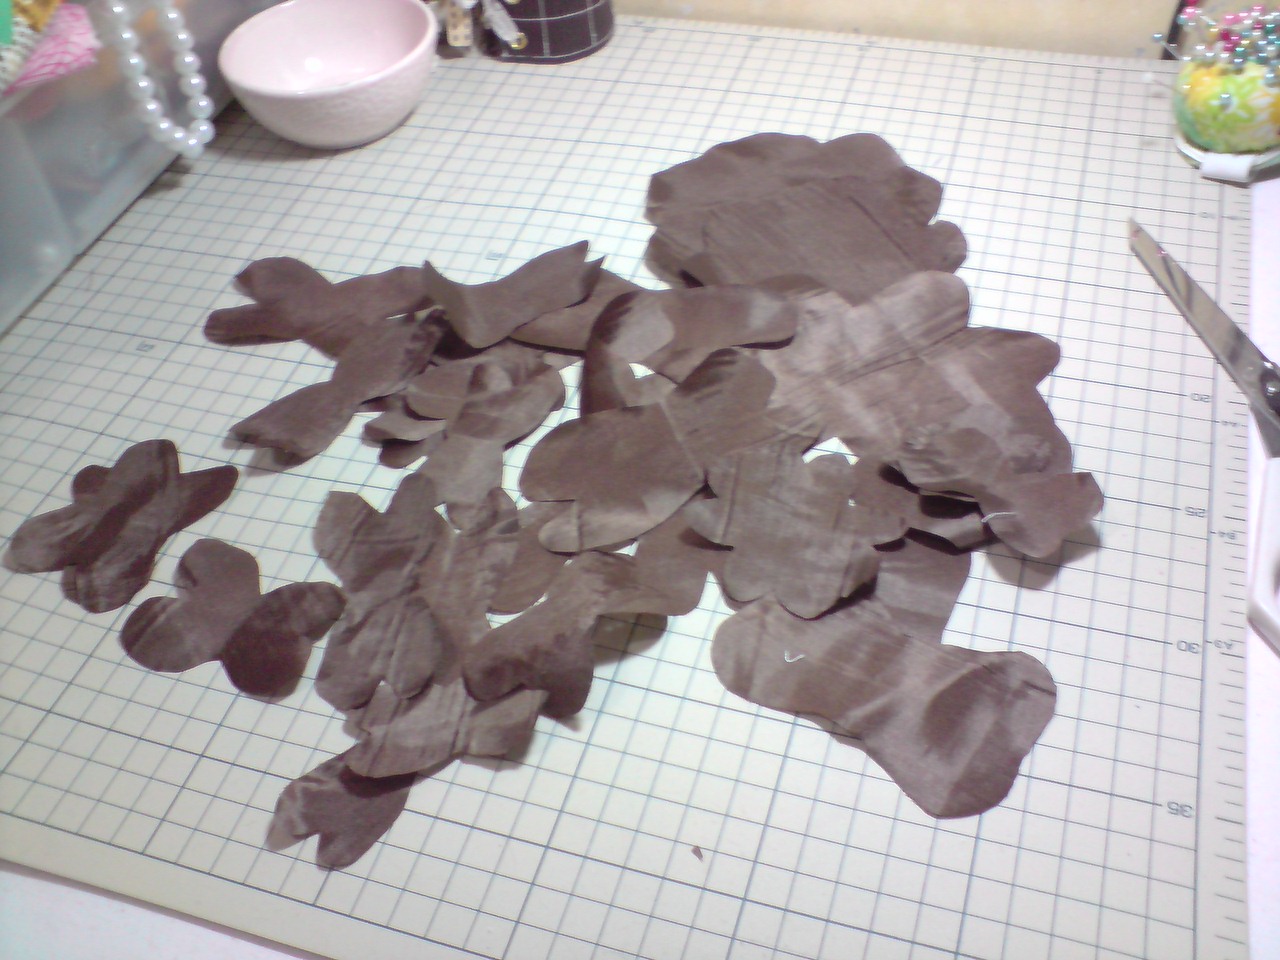
Potong semua bahan sisa sampai habis, lalu bakar ujungnya

Cut all the scraps. And then burn the edge

Susun satu persatu dari kelopak yang paling besar sampai yang paling kecil, tahan dengan jarum pentul

Arrange one by one all of the petals from the biggest to the smallest, hold them with pin
Lipat menjadi dua, jahit bagian belakangnya

Fold them, and then stitch the back side
Lipat lagi ke arah yang berlawan lalu jahit

Fold again to the opposite direction, then stitch
Begini setelah dijahit belakangnya

Here's how its look after you stitch the back
Setelah itu ambil mutiara imitasi untuk menghias pusat bunga

Now go get a faux pearl to embelish the center
Saya berniat untuk bikin bando untuk keponakan, menggunakan bunga tadi

I intend to make headbands for my niece

Lalu saya mengambil karet kurang lebih sepanjang 40cm, lalu jahit ke bunga. Saya lalu memotong kain velt untuk menutupi jahitannya, tempelkan dengan menggunakan lem tembak

Then I grab a rubber band about 40cm long, then attach it to the flowers. I also cut felt to cover the stitch, attached it using hot glue


 Saya hanya punya dia untuk jadi model bando saya :))

I only had her to be my model, oh well :))

Oh ya, maaf saya hanya memberi tahu cara bikin bando menggunakan karet yang sudah jadi, karena bandana dari bahan kaos seperti yang dipakai beruang pada foto pertama gagal, tapi saya akan coba lagi lain waktu, dan saya harap akan berhasil, kalau iya, baru saya bikin tutorial cara bikin bando menggunakan bahan karet. Ok, selamat berkarya.

Oh, I am sorry for only showing you how to make headband using the rubber band, because the one that the bear wore on the first picture was totally failed, but I'll try to remake it someday, I wish it will be succes. And if they do, I'll post the tute here. Allrighty then, happy crafting.

xoxo

8.01.2010

What I do in my "20 minutes leisure"

I bought four plain baby tee, I am going to make presents for my sister and aunt, for their new baby born. And they are;

I am King B

I am an IT expert

Wanna dive with me?

If you wanna go to the office with dad, you have to dress like him ;)
I don't have time to make the tutorial photos, but I'll bet you can do it. it's a piece a cake, just drew any shape, and trace it to your fabric, cut and then sew them on tee. Voilaa ....

xoxo

7.22.2010

I'm still here

Yes, I choose that title to show you that I'm still alive and still here :).

I was busy lately, I have one more role to play, which is a kindergarten teacher -literally-, these weeks were our new semester, full of efforts to calm down newbie and teach them from zero, but I am happy doing this, despite missing to craft more.

And I was mural painting the school's pool wall, I don't have the picture now but I'll update them as soon as possible. Enough for now, see you later alligator :p

update: pool's wall before we paint it


 These are my teacher fellows, I drew the picture on the wall, and we paint it together.
And yes, I forgot to take the after picture (I guess this post will end up trilogy :0)

xoxo

6.25.2010

Font gratis (free fonts)

Pernah mampir ke blog kevinandamanda?, belum? coba kesana deh, foto fotonya bagus banget dan mereka punya font gratis untuk didownload, sangat berbakat dan baik bangeeet, font gratis?? hari gini ...

Have you visit kevinandamanda blog? try visit them, they have fabulous pictures there and also free fonts to download, very talented and generous, free fonts?? yippeee ...........


xoxo

6.21.2010

Not So Quick Post

Halo semua, maaf sudah berhari hari nggak update blog, kebetulan minggu kemarin saya agak sibuk membantu teman yang sedang mempersiapkan kostum untuk perpisahan TK-nya. Kebetulan temanya "Around The World", jadi dia harus memakai baju yang mempresentasikan tema tersebut, awal ceritanya teman saya meminjam baju hanbok yang pernah saya beli di toko 'babe' seharga 40,000 ribu -yup seneng banget bisa dapetin barang bagus dengan harga murah- tapi masalahnya hanbok itu ga ada boleronya, jadi hanya dalam 2 hari saya harus bikin 2 bolero, dan yang paling parah adalah, saya tidak tahu apa2 tentang menjahit baju dari awal pengukuran sampai selesai --', tapi alhamdulilah dengan segala trial and error dan dedel sana dedel sini selesai juga tuh bolero (sayang sekarang lagi ada di laundry, kalo sudah selesai mungkin saya kasih tau wujudnya).
Baik, cukup tentang saya, sebagai ganti karena beberapa hari ga update, saya ada tutorial lama saya yang belum di upload, gambarnya pun masih gelap, tapi mudah mudahan masih bisa kebaca dan dimengerti, ibu ibu .... saya persembahkan tutorial tote bag saya;

Hi everyone, i'm sorry for not blogging for days, last week I was helping my friend to prepared costumes for her kindergarten graduation party. The theme is "Around The World" so she had to wear foreign outfit, it begun when she borrowed my hanbok that I was bought from the thrift store for 40.000 rupiahs -yup, i'm soo thrill to get fine quality dress on a cheap price- the problem is that hanbok have no bolero with it, soo I have to make 2 boleros in 2 days, and the worst part is I don't know nothing about making my own dress from measuring until it finish -sighs-, but thankfully with all the catrasthrope and unsew here and there, I finally finished those boleros (too bad their on the laundry right now, maybe I'll show you when it's done).
Allright enough about me, to show you how sorry I am for not updating in days, I have this old file that haven't been share yet, and the picture were still dark but I hope it can be read and understanable (is it a right word?), anyway ladies .... I present you my tote bag tutorial;

please click the image to enlarge

1. Gathered materials
     a. 4 pcs 4' x 14' for bottom and upper outer
     b. 2 pcs 6' x 14' for center piece
     c. 2 pcs 2' x 20' for handles
     d. 2 pcs 2' x 20' for handles
     e. 2 pcs 13' x 14' for inner
2. Attach a and b as shown in the picture number 2
3. Making corner box, I measure 1.5' from the tip, cut the excess
4. Machine baste c and d together
5. Wrap around handles
6. Attach handles on the outer side of the bag
7. Attach inner and outer as shown on picture number 7, leave about 2' holes to wrap around your bag
8. And you're done :))

xoxo

6.11.2010

Tas Tempat pensil ku (My Pencilcase Clutch)

Teman saya memberi saya ini, karena dia tahu saya seneng banget sama stationery, perhatian banget sii

A friend gave me this, because she knew how I heart stationery, very thoughtful of you

Tapi saya lihat ada potensi lain dari tempat pensil ini, lalu saya coba bikin versi saya ....

But I saw her in another way, and I made my own version ...

Dan lahirlah dia :)), cantik yaa .. hehehe

And this beautiful baby was born ... isn't she pretty? lol

Dan ya, saya akan kasih tau cara bikinnya, monggoo ....

And yes, I'm gonna show you how to make them, so here we go ..

Oo, kayanya saya lupa kasih komen di foto ini, tapi kayanya gambarnya cukup jelas kan?

Oops I think I forgot to add caption on this pic, but I think the picture says the word


Lalu saya menambahkan mutiara kurang lebih 10' di bagian pegangan yang tadi saya tambahkan diatas resleting, juga membuat bunga dengan membuat lingkaran lalu saya cubit bagian bawahnya, lalu di'amankan' dengan menjahit tangan, juga menambahkan mutiara kecil diatasnya, lalu membuat lengkungan di tepi lingkaran tersebut (maaf lupa ambil fotonya)

And then, I took about 10' of faux pearl beads as handle, I also made flower by making circle pattern and I pinch the bottom and secured it with hand stitch, I also add little pearl on it then making scallop on the circle's edge, I hope I say it in English right  --' (sorry I forgot to take picture of this action)

Dan beginilah saya membawanya, dan tempat pensil saya sudah berubah jadi tas tangan kecil .. selamat berkarya

And this is how I carry them, and my pencilcase has turn into a clutch ... have a nice crafting


p.s:
Kalau ada kesulitan dalam instruksinya, jangan segan segan email saya ya .. :)

If  you have any difficulties following my instructions please feel free to email me ..:)

xoxo

6.09.2010

Pagi semua ...... :))) (Morning everyone .... :)))))

Kenapa saya pasang emoticon di judul blog saya, yup karena saya sedang bahagia pagi ini. Ketika sedang membuka di blog langganan saya TOTALLY TUTORIALS , saya menemukan ini

Why I put an emoticon on my post title, yup because i am happy this morning. When I was browsing on my favorite blog TOTALLY TUTORIALS, and I found this


Itu salah satu tutorial saya yang ini , dan yaa, tutorial saya ditampilkan disana (kalo bisa masukin emoticon, saya akan masukin gambar orang jingkrak-jingkrak sekarang). Saya masukin tutorial itu sudah hampir semingu lebih dan ga  nyangka bakal masuk, saya kan baru dalam dunia blog dan belum cukup berpengalaman dalam hal tutorial dibandingkan blog blog cakep diluar sana, dan qualitas fotonya -silahkan komen sendiri deh-. 
Yang pasti sangat berterima kasih pada admin totally tutorials karena sudah memuatnya. Ini salah satu hal yang membuat saya ingin lebih semangat berkarya dan memperbaiki segala kekurangan dalam blog saya sehingga lebih enak dibaca. Dan juga terima kasih bagi yang telah komen atau hanya membaca blog saya, dukung saya terus ya (kok kaya lagi dapet penghargaan gini??), tapi sebagai pendatang baru dalam dunia blog ini merupakan penghargaan buat saya, sekali lagi terima kasih.

Those are one of my tute,  and yup i was featured there (if only I could put an emoticon, I would put a straddling teenagers now). I was applying that tute for about a week ago, and I don't think it would be featured, I am a new blogger and I don't have enough experience than those great blogs out there, and the pic quality -okay, you may comment as you preffered-.
One thing for sure, I am thanking to totally tutorials admin for featuring this. This is definitelly one thing that encourage me to be craftier and improve my blog to be readible. And for those whose commented or just blogwalking, thank you, please keep supporting me (is it like an award winning speech?), but as a new blogger this is an award for me, once again thank you.

Dan dengan bangga saya persembahkan

And I am proudly to show you this 


Update:  I was also featured at Craftgossip , yaaaaay ... thank you Linda

xoxo

6.06.2010

Gelang kulit ber-renda (Laced faux leather cuffs)


Kemarin saya iseng iseng bikin gelang berukuran besar, kebetulan saya punya bahan kulit imitasi dan ternyata hasilnya lumayan, jadi saya bikin satu lagi untuk saya post disini, dan ini dia ...

I was making a bangle yesterday, just for fun, I happened to have a quarter yard of faux leather and it turns out not bad, so I made another one to post here, and here it goes ...

Siapkan bahan2; Kulit, bahan katun, renda, pita dan cutter (tidak ada dalam gambar) koran bekas, gunting koran, gunting bahan, meteran, penggaris, mata ayam, alat pasang mata ayam

Gathered materials; Faux leather, cotton fabric, lace, ribbon and paper cutter (not pictured), old newspaper, paper scissor, fabric scissor, measures, ruler, eyelette, eyelette pliers

Ukur pergelangan tangan, ukuran saya 7" dan lebar 2"(atau disesuaikan dengan kelebaran yang diinginkan), lalu gambar pola di kertas koran terlebih dahulu untuk mendapatkan hasil yang lebih rapih. Ketika menggunting selalu lebihkan 0.25" untuk jahitan samping

Measure your wrist, mine was 7" by 2" width (or you can adjust the width as you wish), then make pattern on an old newspaper to get a neater result. Add 0.25" on every measures for side seam. 

Lalu kita mendapatkan hasil seperti pada gambar sebelah kiri; 1 bahan kulit, 1 bahan katun, 2 pasang mata ayam, 2 renda (saya menaruh renda berdekatan sehingga seperti satu renda). Jahit kulit, renda dan bahan secara bertumpuk, dengan kulit dan bahan berhadapan pada bagian depan, bagian depan renda menghadap ke arah bahan.

And we gathered like you can see on the left picture; 1 faux leather, 1 cotton fabric, 2 pairs of eyelette, 2 laces (I put the laces too close and it looks like only 1 lace). Machine baste the sandwiched leather, lace and cotton, leather and cotton facing the same side together, and laces be face with cotton.


Jahit berbentuk U sehingga menyisakan sisi lain terbuka, potong sudut-sudutnya berbentuk segitiga agar rapih ketika dibalik. Balik jahitan, agak perlu usaha keras, soalnya bahan kulit lumayan kaku.

U stitch the fabric so it leave the other side open, trim the corner in triangle shape to avoid bulk when the fabric were wrap around. Wrap around the fabric, this is a little bit tricky because leather were quiet stiff.

Sekarang lipat ujung yang terbuka, lalu jahit terus hingga menemui awal jahitan. Sudah hampir selesai nih.

Now fold the open side then stitch, stitch along the rectangle until you find your first start. You almost done.

Sekarang tinggal memasang mata ayam, ukur sisi sisinya hingga mendapat 2 titik untuk memasang mata ayam secara simetris, saya menggunakan obeng + untuk melubanginya. Lalu, pasang!

It's time to attach the eyelette, measure the sides to put 2 holes of eyelette symmetric, I am using + screwdriver to make holes in it. Then, punch!

Saya melakukan ini untuk mendapatkan hasil yang sama pada sisi lainnya, lalu pasang pita seperti memasang tali sepatu, dan ......

I did this to get an even holes on the other side, then set the ribbon like your setting a shoelaces, aand ....


VOILAA ....

Sekarang saya punya 2 gelang, dan ternyata lucu juga sebagai pemanis toples kecil saya.

I have two bangles now, and it also cute as my jar cozy.

Oya rendanya juga bisa dirimpel dulu sebelum dipasang, untuk mendapatkan hasil yang lebih "penuh". 
Ini adalah tutorial dengan gambar terbanyak yang saya post, semoga kamu suka dan ga bt karena kebanyakan gambar :))

Ow, you can also ruffled the lace first to have a fluffier results. 
This tute had the most pict that i've ever posted, hope you'll like it and not getting annoyed with many photos :))
I love the corset look on my cuffs

xoxo